Showing posts with label Helpful Tips. Show all posts

Tuesday, October 2, 2012

Baking Tips For French Macarons

Apart from being something delicious that melts in your mouth. Macaron is a french confection that is made with egg whites, confectioner's sugar, ground almonds and food coloring and commonly filled with a ganache, buttercream or jam filling making it also a gluten free dessert. 

I've had a hankering to make macarons for some time but I found the process of making macarons delicate but I think doable. So I arm myself first with some helpful tips and techniques that I can use in my journey to making the Macaron!


Use Aged Egg Whites

Use Aged Egg Whites

Aging the egg whites dehydrates them, resulting in a firmer, more stable meringue. Place your egg whites in a plastic wrap-covered, nonporous bowl, and poke a few holes in the plastic with a toothpick. Leave the bowl in the refrigerator for up to three days. Be sure to bring the egg whites back to room temperature before using.


Use the Freshest Ingredients

Use the Freshest Ingredients
A recipe calling for aged eggs does not mean that you should use eggs past their expiration date! Buy only the freshest ingredients including almond meal: old almond meal causes a macaron to lose its glossy luster.


Back to the Grind

Back to the Grind
Your almond meal should be very finely ground so that it fits through a mesh sieve. If you're using packaged almond meal that appears too coarse to sift, give it a good grind in a food processor to break apart any larger pieces.


Gel With Your Color

Gel With Your Color

Liquid food coloring can alter the texture of your macarons, making your batter too runny. I use gel color and add it while whipping the meringue. Don't be afraid to use a little too much: incorporating the almond meal mixture slightly diminishes the potency of the color.


Don't Sweat the Technique

Don't Sweat the Technique
Every baker has an opinion about the best way to create the perfect macaron batter, a process known as macaronnage. The idea is to press out just enough air from the batter so that it runs off your spatula thickly, slowly, but consistently. I like to gently fold the dry ingredients into the meringue, scooping from the sides, and then "punch" the center of the batter with my spatula. Others prefer pressing the batter in
to the side of the bowl. Find what works best for you.


Let Dry


Let Dry
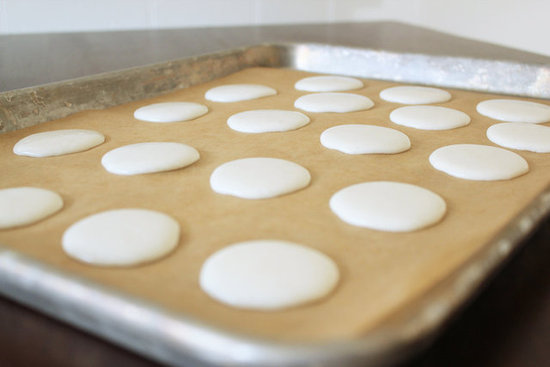
If you find that the tops of your macarons are cracking in the oven, allow your piped macarons ample time to dry with the next batch. This can take upwards of 30 minutes to an hour, depending on the humidity of the room. You'll know they are adequately dried when you dab the tops with your finger and nothing sticks.


Banish Humidity

Banish Humidity
I learned this the hard way when one day I couldn't get my macarons to fully dry and I realized that it ha
d just started raining that morning. If it's very humid, use a dehumidifier or wait to bake on a not-so-muggy day.


Hot and Bothered

Hot and Bothered

Forgo the unreliable temperature gauge in your oven and get a trusty oven thermometer instead.


A Crackling Shame

A Crackling Shame
If you sufficiently dry your piped macarons but find that they still crack while baking, your oven may be trapping too much humidity. Try using a wooden spoon handle to prop open the oven door just a smidge for the first two minutes of baking.


Practice!

Practice!
No one gets it right the first time around. With so many variables, you will need to find the equation that works best for you, your kitchen, and your oven. Get ready for a baking adventure, but when you create the perfect, airy-light macaron, it will all be worth it!


Tips and pictures from  www.yumsugar.com


Tuesday, February 7, 2012

Cupcakes 101

Recently, I read a post from another food blog entitles 5 ways to Ruin Homemade Cupcakes. Catching title and really very helpful that's why I thought of reposting this for you guys. Yes, I am one of those bakers who is on the road to baking the perfect cupcake and I admit I have my share with mishaps and bumps in finding the perfect one. Practice makes perfect, as they say. Anyhow, here are the baking blunders to avoid in making the perfect homemade sweeties!


1) Using warm butter rather than “room-temperature” butter “Room temperature” butter is approximately 70 degrees Fahrenheit. When you make cupcakes from scratch, you need butter to be the right temperature so that the dough can rise the right amount and be mixed in thoroughly. When it’s too warm, it mixes in too quickly and changes the texture of the cupcakes. To get the butter’s temperature right, it’s best to take it right out of the fridge and let it defrost in the microwave for about 10 seconds.
2) Not knowing the temperature of your oven
This is one of the most common (and most frequently undetected issues) for at-home bakers. While an ideal oven would always carry even heat throughout without hot spots or anything, many ovens function at less than ideal levels. To test how hot your oven is cooking, and if it has hot spots, line the middle rack of your oven with slices of bread and bake them at 350 degrees Fahrenheit for a few minutes to see how the pieces cook. If you have some spots that are burned and such, remember them, and rotate and bake your goods accordingly. If the whole tray gets burned, it may be that your oven just cooks hotter all around, and if it’s barely toasted at all, it may be too cool.
3) Making unwise substitutions
Many chefs like to get creative in the kitchen, but while substituting herbs and spice in a recipe can be great – baking is not usually that forgiving. To get your foods to rise properly and have the right textures, you need to have the right ingredients in a fairly delicate balance. If you would like to make substitutions, these are a few great emergency substitutions you can use, but otherwise substituting things in a baking recipe is a bad idea because it disrupts the underlying chemistry of the dish!
4) Baking too long
Cupcakes are very delicate given their size and higher exposed surface area.  Baking them for even a little too long can cause them to dry out very quickly. If the recipe says 30 minutes, check them at 25 minutes with a toothpick just to check how they’re doing. Once the tester comes out clean, it’s time to take them out of the oven, since residual heat will continue cooking them anyway.
5) Letting them sit too long in the pan
If you leave your baked cupcakes in their hot pan for too long, you’re likely to end up with soggy cupcake wrappers and overcooked cake! After you take them out of the oven, wait 10 minutes and remove the cupcakes from the muffin tin – otherwise they will absorb too much liquid and become wet.

Tuesday, January 17, 2012

Baking 101 for Mommies


I love going natural... It's the best thing I can do for my family and friends whom I share my passion for cooking and baking. Using premium products for my homemade baked goodies may be a bit pricey but it does yield good results and it gives me assurance that I'm serving only the best ingredients I can find in the market today. So, why not splurge a little? 

Here's a peek to some of my pantry must-haves to my culinary and pastry journey: 


One of my favorite pastry chef davidlebovitz explains it well on his blog why using premium and aluminum-free baking soda and powder is better than the normal stuff... and I agree!


If I bake for the little tummies I only use these..


Of all the varieties of A.P Flour in the market I prefer the Pillsbury for my baking and cooking needs.


I love mixing a teaspoonful of wheat germ in my champorado =)


In theory, unsalted should be of a better quality
as there is no salt to mask the underlying taste of the butter.


for eggs, I use organic or premium that are in the grocery stores.
Next time I should try the local weekend market. Here's a link on how to store eggs.

Delicious muscovado sugar is a real treat!


I love bobs red mill and arrowhead mill products. I buy them only at Healthy Options branches, my go to place for healthy ingredients aside from weekend markets where local organic producers also display very good stuffs ( hmm, I should write about it... hehe).